Mastering the 3D Glasses Mini Embroidery Design for Modern Projects
In the evolving landscape of machine embroidery, the demand for niche, character-driven designs has never been higher. Among these, the 3D Glasses Mini Embroidery pattern stands out as a versatile asset for creators looking to add a touch of retro nostalgia or cinematic flair to their work. This specific design stitches a pair of iconic 3D glasses, capturing the essence of movie nights and virtual reality in a compact, stitch-efficient format. For professionals, hobbyists, and business owners alike, understanding the technical specifications and practical applications of such a file is essential for maximizing its potential in real-world projects.
Technical Specifications and File Compatibility
The foundation of any successful embroidery project lies in the quality and compatibility of the digital file. The 3D Glasses Mini Embroidery design is engineered to accommodate a wide array of machinery, ensuring that users regardless of their equipment brand can utilize the pattern effectively. The package includes eight distinct formats: DST, EXP, HUS, JEF, PEC, PES, VP3, and XXX. This extensive list covers the major industry standards, from Brother (PES) and Janome (JEF) to Husqvarna (HUS) and Bernina (EXP), making it a truly universal resource.
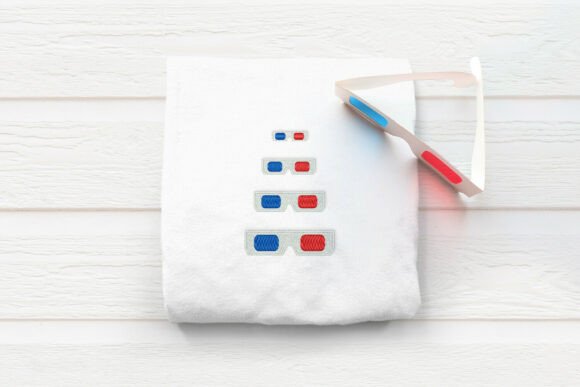
Beyond format compatibility, scalability is a critical factor for mini designs. This particular asset provides four specific sizes: 1 inch, 1.5 inches, 2 inches, and 2.5 inches. This range allows for significant flexibility. A 1-inch version might be perfect for a delicate monogram on a handkerchief or a small logo on a pet collar, while the 2.5-inch option offers enough detail to serve as a focal point on a tote bag or a child's t-shirt pocket. Having multiple pre-digitized sizes ensures that the stitch density and pull compensation remain optimized for each dimension, preventing issues like puckering or thread breaks that often occur when users manually resize files without professional software.
Operational Workflow and Machine Settings
Executing the 3D Glasses Mini Embroidery requires attention to the specific stitching order defined within the file. The design is structured so that stitching steps are separated by color changes. This methodical approach is intentional, designed to ensure clean color transitions and proper layering of the graphic elements. It is imperative that operators do not color sort or combine colors within their embroidery software. Altering the sequence can disrupt the underlay structure or cause the top threads to sit incorrectly, compromising the visual integrity of the glasses.
For those operating multi-needle machines, a specific configuration is required. Users must set their machine to stop for color changes rather than allowing it to auto-trim and continue if the design relies on manual thread swaps for specific effects, although most modern multi-needle setups handle standard color stops efficiently. The key is to respect the native sequence of the file. If the design calls for a pause to switch from the frame color to the lens color, the machine should honor that instruction. This discipline ensures that the final output matches the sample stitch provided for demonstration purposes.
It is also crucial to clarify what is included in the download. The listing provides only the digital embroidery files described. Any extra items shown in promotional images, such as hoops, fabrics, or finished garments, are for demonstration purposes only and do not come with the design. Furthermore, this is strictly a machine embroidery design; it is not a PDF pattern for hand embroidery. Users must possess an embroidery machine and a reliable method to transfer the design files—whether via USB, Wi-Fi, or direct cable connection—to utilize the product effectively.
Diverse Applications Across Industries
The utility of the 3D Glasses Mini Embroidery extends far beyond simple decoration. Its compact nature and recognizable imagery make it suitable for a broad spectrum of applications across various sectors.
- Educational Institutions: Schools and drama clubs can use this design to create uniforms or memorabilia for film studies classes, theater productions, or media clubs. The 1.5-inch size is ideal for breast pockets on blazers or polo shirts.
- Retail and Merchandising: Business owners selling cinema-themed merchandise can apply the 2-inch or 2.5-inch versions to tote bags, popcorn buckets covers, or concession stand aprons. The retro aesthetic appeals to customers nostalgic for classic movie-going experiences.
- Event Planning: For movie night events, corporate screenings, or film festivals, these designs can be stitched onto lanyards, badge holders, or giveaway caps, providing a cohesive and professional look to event swag.
- Personal Gifting: Hobbyists can create personalized gifts for film buffs. Stitching the design onto a blanket, pillowcase, or a custom patch for a denim jacket adds a unique, handmade touch that mass-produced items cannot replicate.
Material Considerations and Stabilization
While the design is versatile, the choice of substrate plays a pivotal role in the final outcome. Because this is a mini design with potentially dense satin stitches to define the frames and lenses of the glasses, fabric stability is paramount. When working with stretchy materials like jersey knits or performance fabrics, using a high-quality cut-away stabilizer is recommended to prevent distortion over time. For woven fabrics like cotton twill or denim, a tear-away stabilizer may suffice, provided the fabric has a tight weave.
The small scale of the 1-inch and 1.5-inch versions demands precision in hooping. The fabric must be drum-tight to prevent the needle from pushing the material down into the throat plate, which can lead to bird-nesting or skipped stitches. Additionally, thread selection should match the intended use. Polyester threads offer durability and sheen, making them suitable for items that will undergo frequent washing, such as apparel. Rayon threads provide a superior luster, ideal for decorative items like wall hangings or display pieces where the visual pop of the 3D glasses is the primary focus.
Advantages for Content Creators and Researchers
For researchers studying trends in digital manufacturing or content creators documenting the embroidery process, the 3D Glasses Mini Embroidery serves as an excellent case study. It exemplifies the shift towards specialized, ready-to-use digital assets that lower the barrier to entry for custom manufacturing. The inclusion of multiple formats and sizes in a single zip file demonstrates an understanding of user needs, reducing the time spent on file conversion and resizing.
Moreover, the design highlights the importance of clear documentation in digital products. The explicit instructions regarding color changes and machine settings serve as a model for how technical data should be communicated to ensure user success. By adhering to these guidelines, creators can avoid common pitfalls and produce high-quality results consistently. This reliability builds trust and encourages further exploration into machine embroidery as a viable medium for artistic expression and commercial production.
Troubleshooting and Best Practices
Even with a well-digitized file, challenges can arise. If the stitches appear loose or the design lacks definition, checking the tension settings is the first step. Mini designs often require slightly tighter tension to maintain sharp corners and clean lines. Another consideration is the needle size. For smaller details, a finer needle (such as a 70/10 or 75/11) might penetrate the fabric more cleanly than a standard 90/14, reducing hole visibility and improving stitch placement.
Users should also be mindful of the "stop" commands. If a machine ignores a color change stop, it may attempt to trim the thread or jump to the next section incorrectly. Verifying the machine's settings regarding automatic trimmers and thread cutters before starting the job can save time and prevent wasted materials. Always run a test stitch-out on a scrap piece of the same fabric and stabilizer combination intended for the final project. This practice allows for adjustments in tension or speed before committing to the final item.
In conclusion, the 3D Glasses Mini Embroidery design represents a convergence of nostalgic imagery and modern digital convenience. Its comprehensive file support, varied sizing options, and clear operational guidelines make it a valuable tool for a diverse audience. Whether used for educational purposes, commercial merchandising, or personal creative projects, this design offers a reliable pathway to producing professional-grade embroidered goods. By respecting the technical parameters and leveraging the design's inherent flexibility, users can unlock new possibilities in their embroidery endeavors, turning simple threads into engaging visual stories.